This tutorial is to show you how to create very dramatic/contrasted black and white photos using Adobe Photoshop CS5 without any extra plug-ins. I was sent this request from a good friend of mine who is starting to get back into photography, so I thought it would be a good way to kick off my collection of Photoshop tutorials!
Download the source files for free by sharing the tutorial with your friends! This includes the original photo, the texture used, and a Photoshop Action that will automatically perform the steps discussed in this tutorial. [iframe src=”http://www.paywithatweet.com/dlbutton02.php?id=7b52bc1496bb52b3169bc71fbc89cd27″ name=”paytweet_button2″ width = “240px” height = “24px” scrolling=”No” frameborder=”no” id=”paytweet_button2″]
Step 1
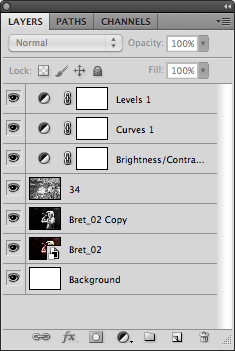
I started by duplicating the original image. You can do this by pressing CMD + J on Mac, CTRL + J on PC, or right click on the layer and click “Duplicate Layer…” I do this so that I always have an original version of the photo to reference. Once duplicated, rasterize the duplicated layer (you can do this by right clicking on the texture layer and clicking Rasterize Layer).
Step 2
Next, convert the photo to black and white by pressing Shift + OPT + CMD + B on Mac, Shift + ALT + CTRL + B on PC, or going to Image > Adjustments > Black & White in your menus. Leave color balance settings at default settings and press ‘OK’ to close the window.
Step 3
Next, you are going to add a series of Adjustment Layers to the photo to give it the contrasty look that we are going for. If your Adjustments window isn’t open, go to Windows > Adjustments to add it to your workspace. Apply the following settings to each adjustment layer.
[note_box]NOTE: Arranging the adjustment layers in a different order will change the final look of the photo. This may be something you want to play around with to see the different effects when re-arranging the layers. Also, try some of the presets within the adjustment layers; they are usually a good starting point and from there you can modify the settings to your liking without much trouble.[/note_box]
|
|
|
|
Step 4 (optional)
I like to add textures to my B&W photos to give them a more textured feel. This step is not necessary at all, but I recommend it. The texture that I use is in the source files folder, which you can download HERE if you haven’t already. For this photo, I placed the texture over the photo, stretched it to fill the canvas, and then rasterize the layer. I then converted the texture layer to black and white, changed the blend mode to Overlay, and lowered the opacity to 20%.
[note_box]NOTE: Adding textures to photographs can really create a dramatic feel. The reason I added the texture to this photo is because I felt the photo was too soft and adding the texture gave it the harsh/dramatic effect I was looking for.[/note_box]

Alternatives For Black and White Conversion
Some people (including myself) prefer to convert their photos to black and white using plug-ins for Photoshop. I am a huge advocate for Nik Software, specifically Silver Efex Pro 2 when it comes to black and white conversion. The look that you get from this plug-in is truly incredible, and I recommend that you check them out! Not only do they make an incredible product, but their customer service is impeccable.
Conclusion
These setting are just a general outline at to what to use. They are going to need to be tweaked to fit each photo, but that’s part of the process of making them look the best. When tweaking, start with the Brightness/Contrast layer, and then adjust the curves or levels layers. Thanks for taking the time to read the tutorial, and I hope it helped! Feel free to contact me and give feedback on my work, I love hearing from you all. If you enjoyed the tutorial, share it with your friends to share the wealth!


